During a stay at a relative’s house, we noticed Toddler’s interest in an old-school radio with volume and tuning dials. It was easy to operate and ludique: the sound changes when you turn the things!
Unfortunately, radio stations are not super kid-friendly (lots of ads trying to sell lawyer services, talk shows, and very few Disney songs). So I decided to build my own, with custom stations.
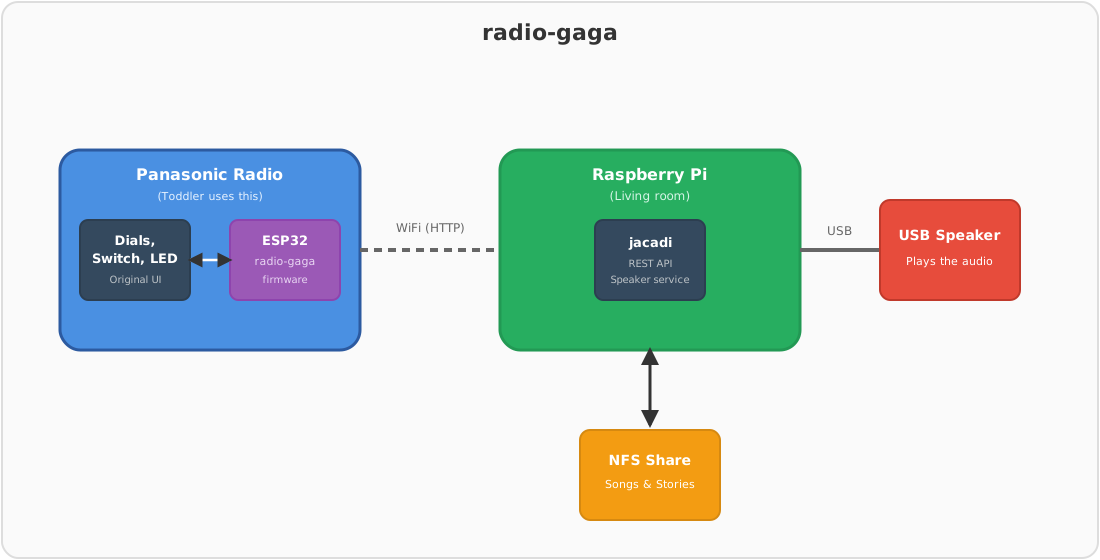
Since I already had a speaker exposed through a REST API from a previous project, I turned a cheap Panasonic radio (an RF-2400) with manual dials, coupled with an ESP32, into a remote controller for it.
I wanted to keep the ESP32 side of things simple: no onboard audio decoding and playback, no speaker to handle, and make it simple to update audio content without having to reflash the firmware every time, so reusing jacadi was a perfect fit.
Architecture
Hardware
Gutting and child proofing
The first step was to unscrew the antenna and discard it from this project. Pointy metal things that can break into pointier metal things are better kept away from toddlers.
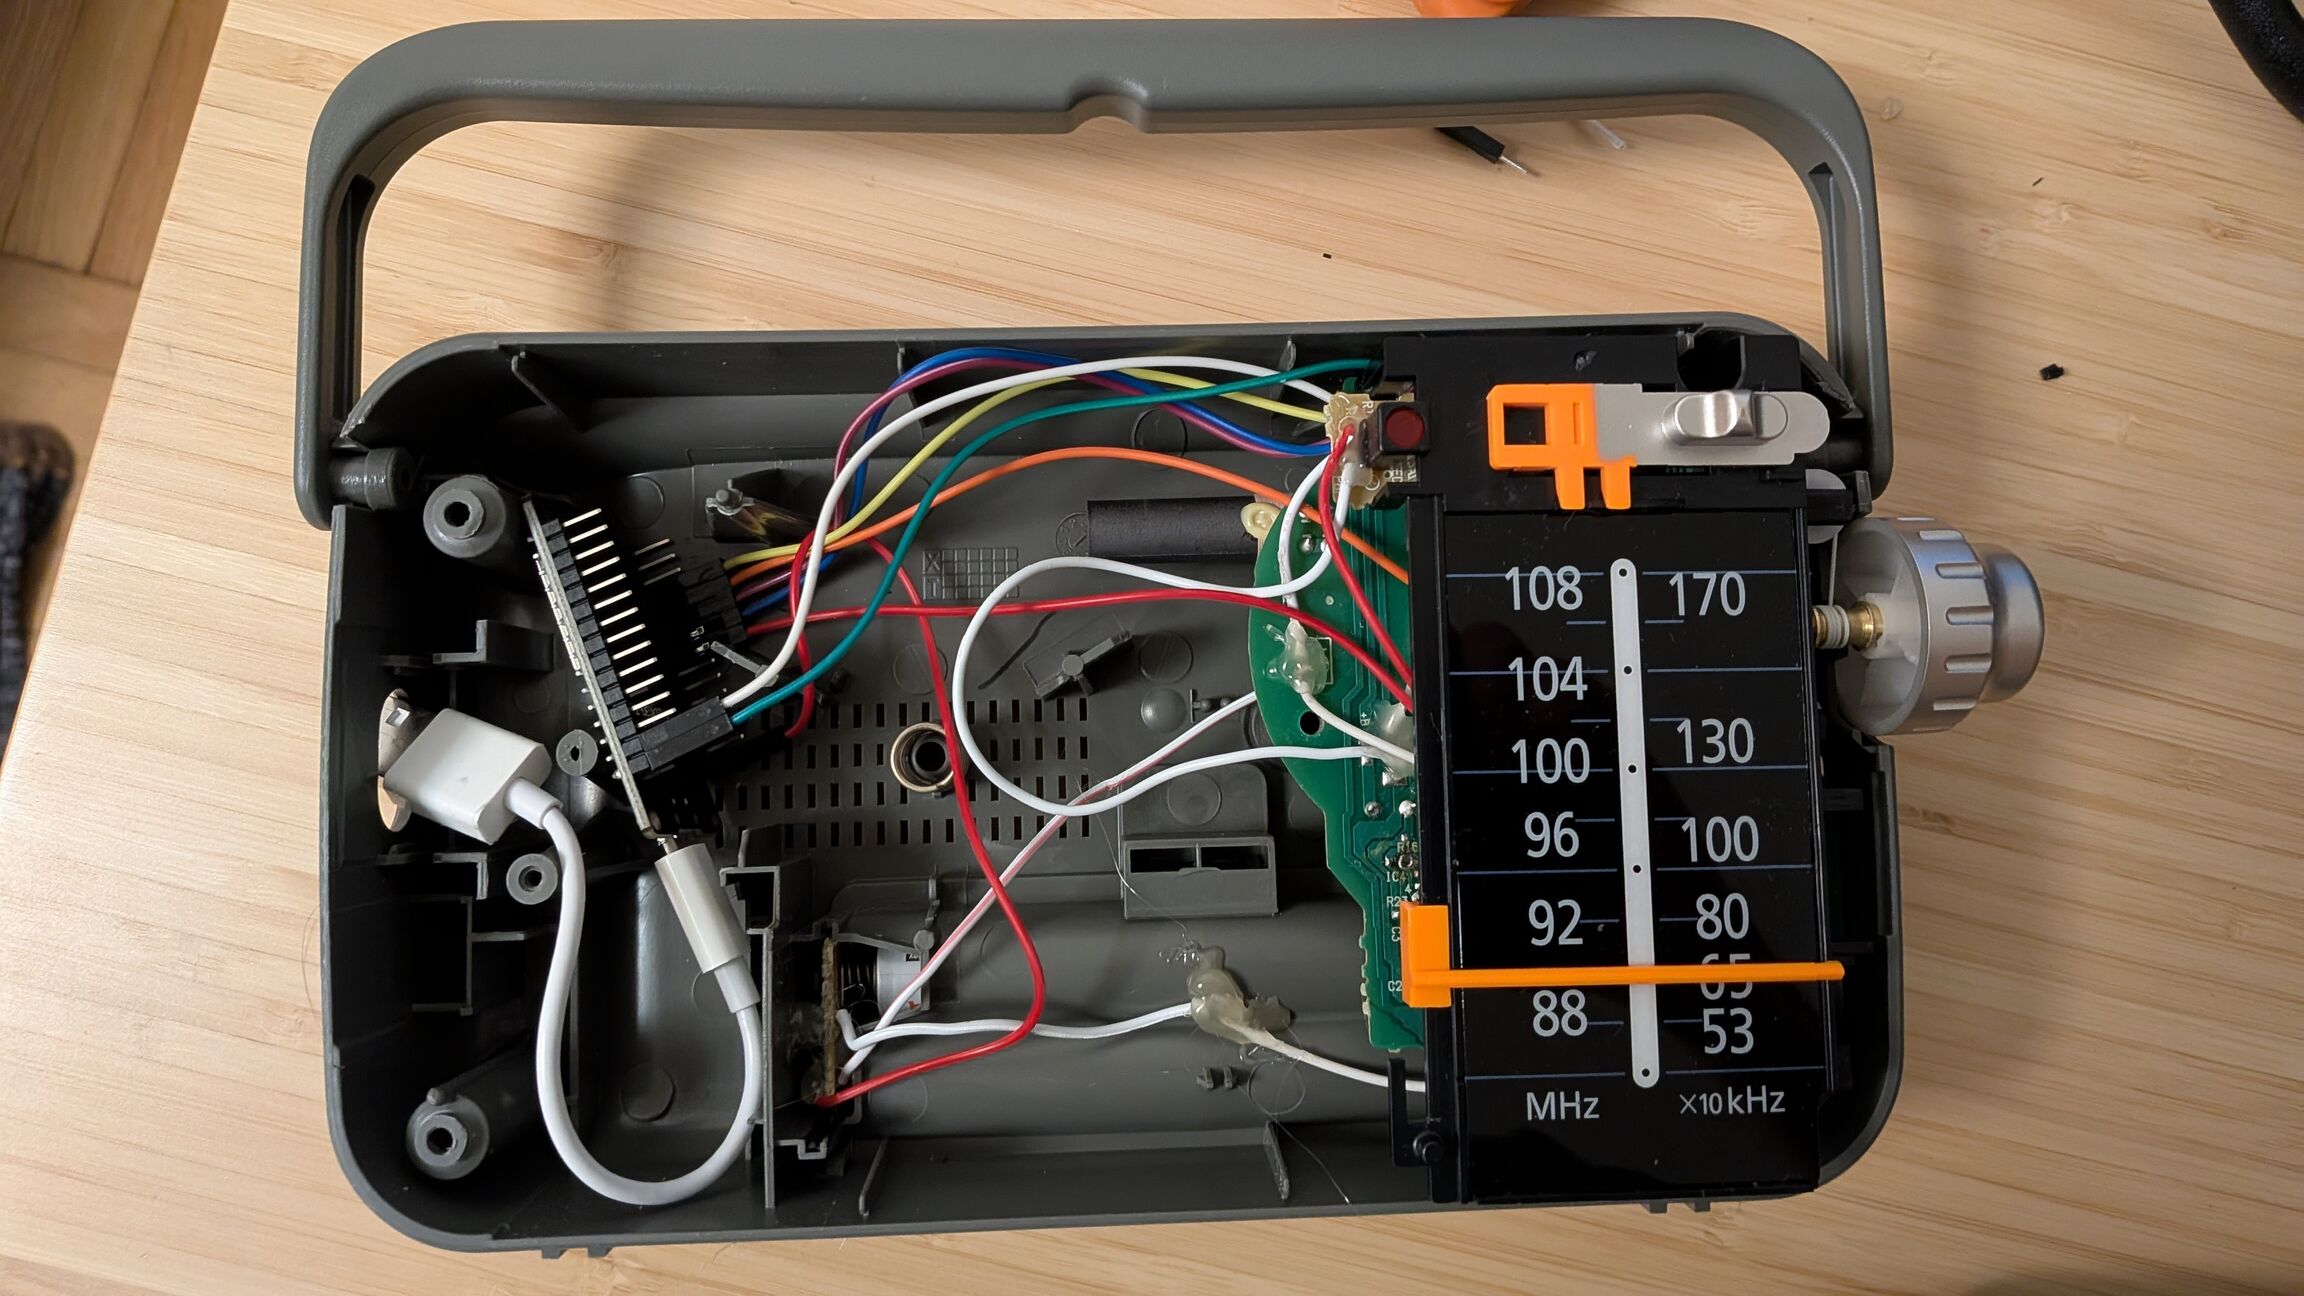
After removing and safeguarding the PCBs, components and switches for future use, I disconnected and removed the speaker entirely (it is heavy, unused, and we will need the room for our ESP32).
Note: removing the speaker will leave a gap behind the speaker grille, showing the wiring and ESP32. To fix this aesthetic issue, I had the brilliant idea of putting the discarded speaker on my photocopier, and printing a copy. While the result looks fine, it obviously drained my black ink cartridge pretty quickly. In hindsight, I should have just reused a dark page from a magazine or other existing paper.
Wiring
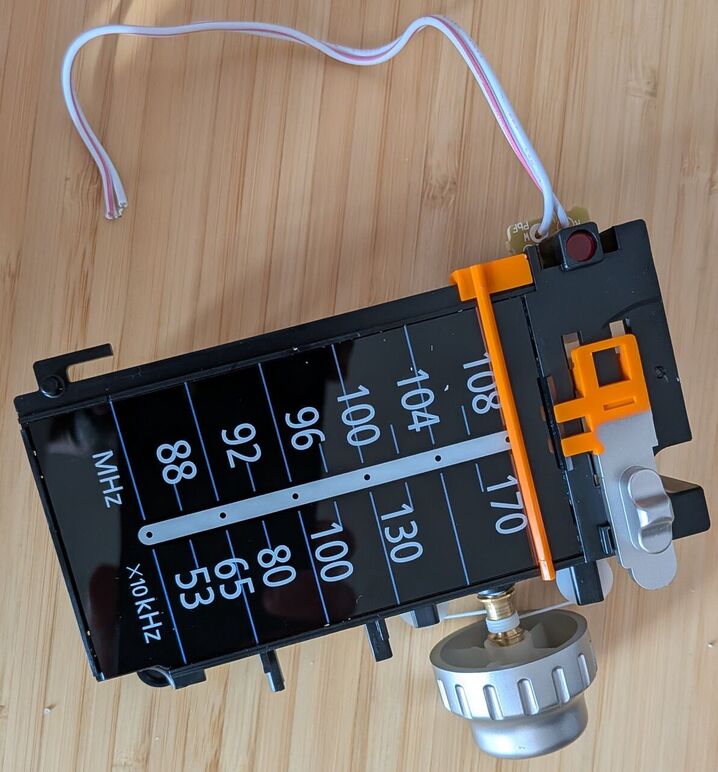
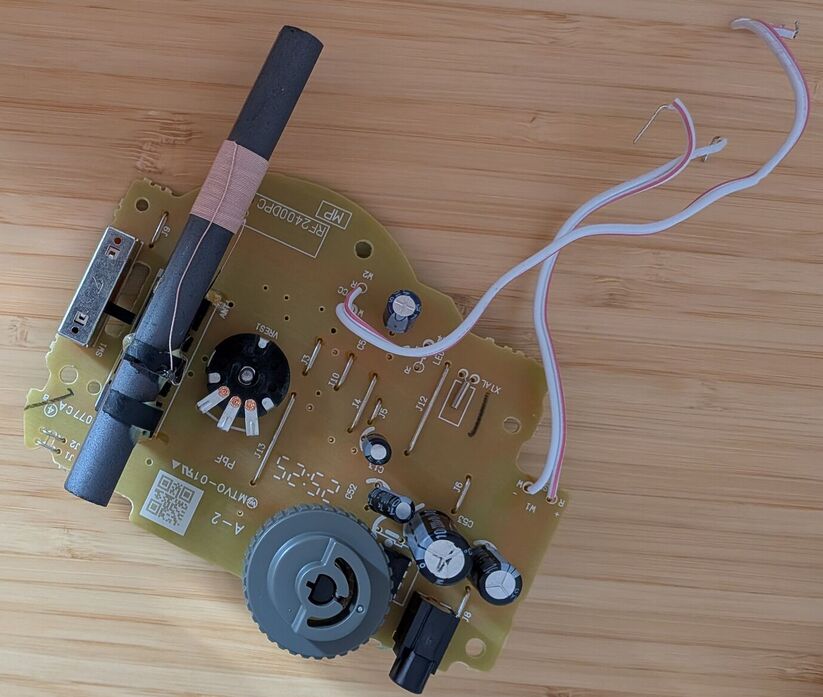
While most of the PCB and components will be rendered useless by our ESP32, we want to retain and repurpose the user interfaces:
- volume dial and potentiometer
- frequency dial and potentiometer
- OFF/FM/AM switch
- red Power LED
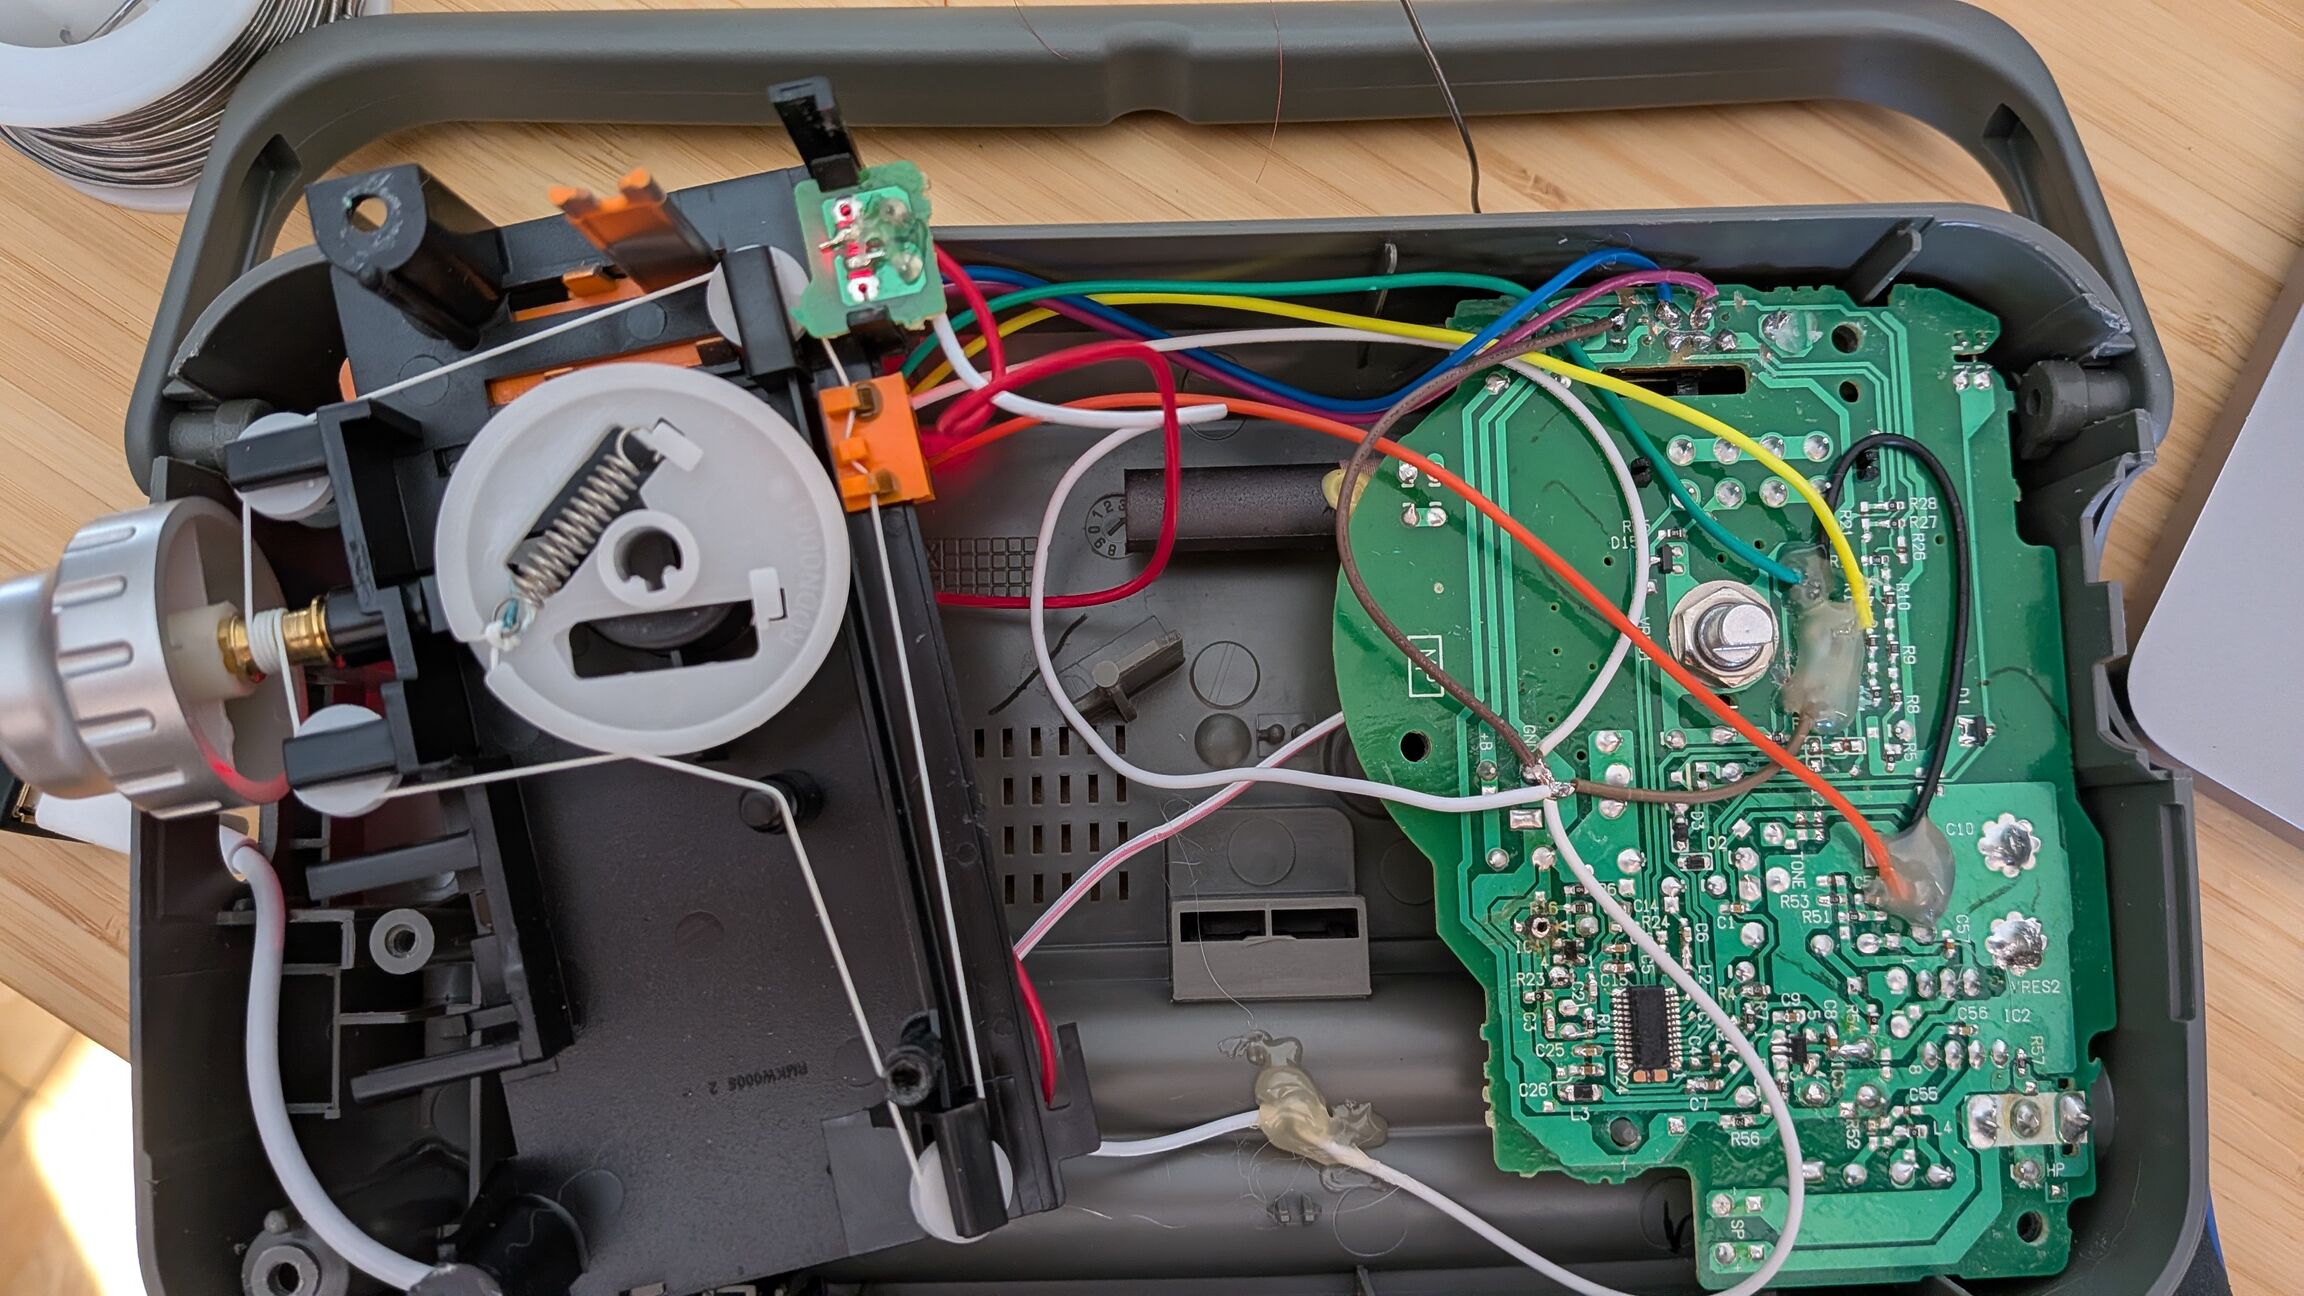
I wanted to keep these components soldered to the original PCB, to retain the structure and stability of the internals.
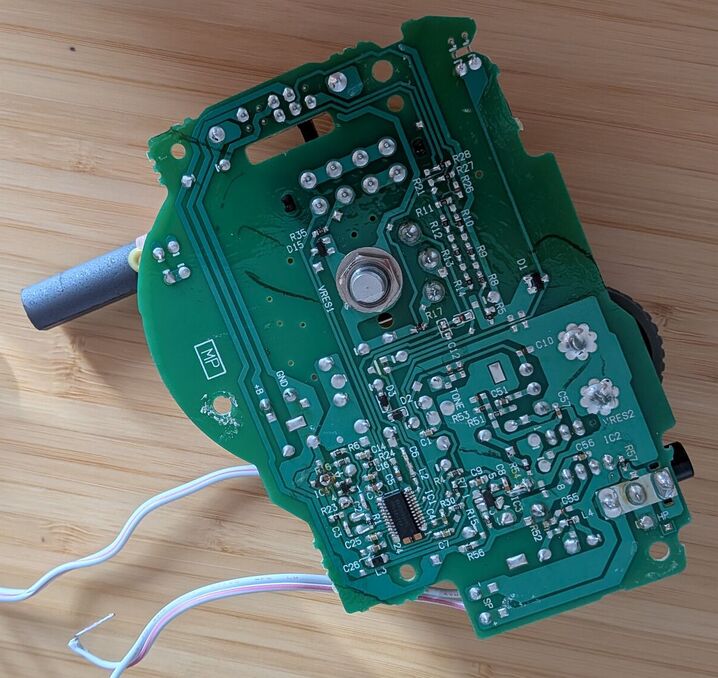
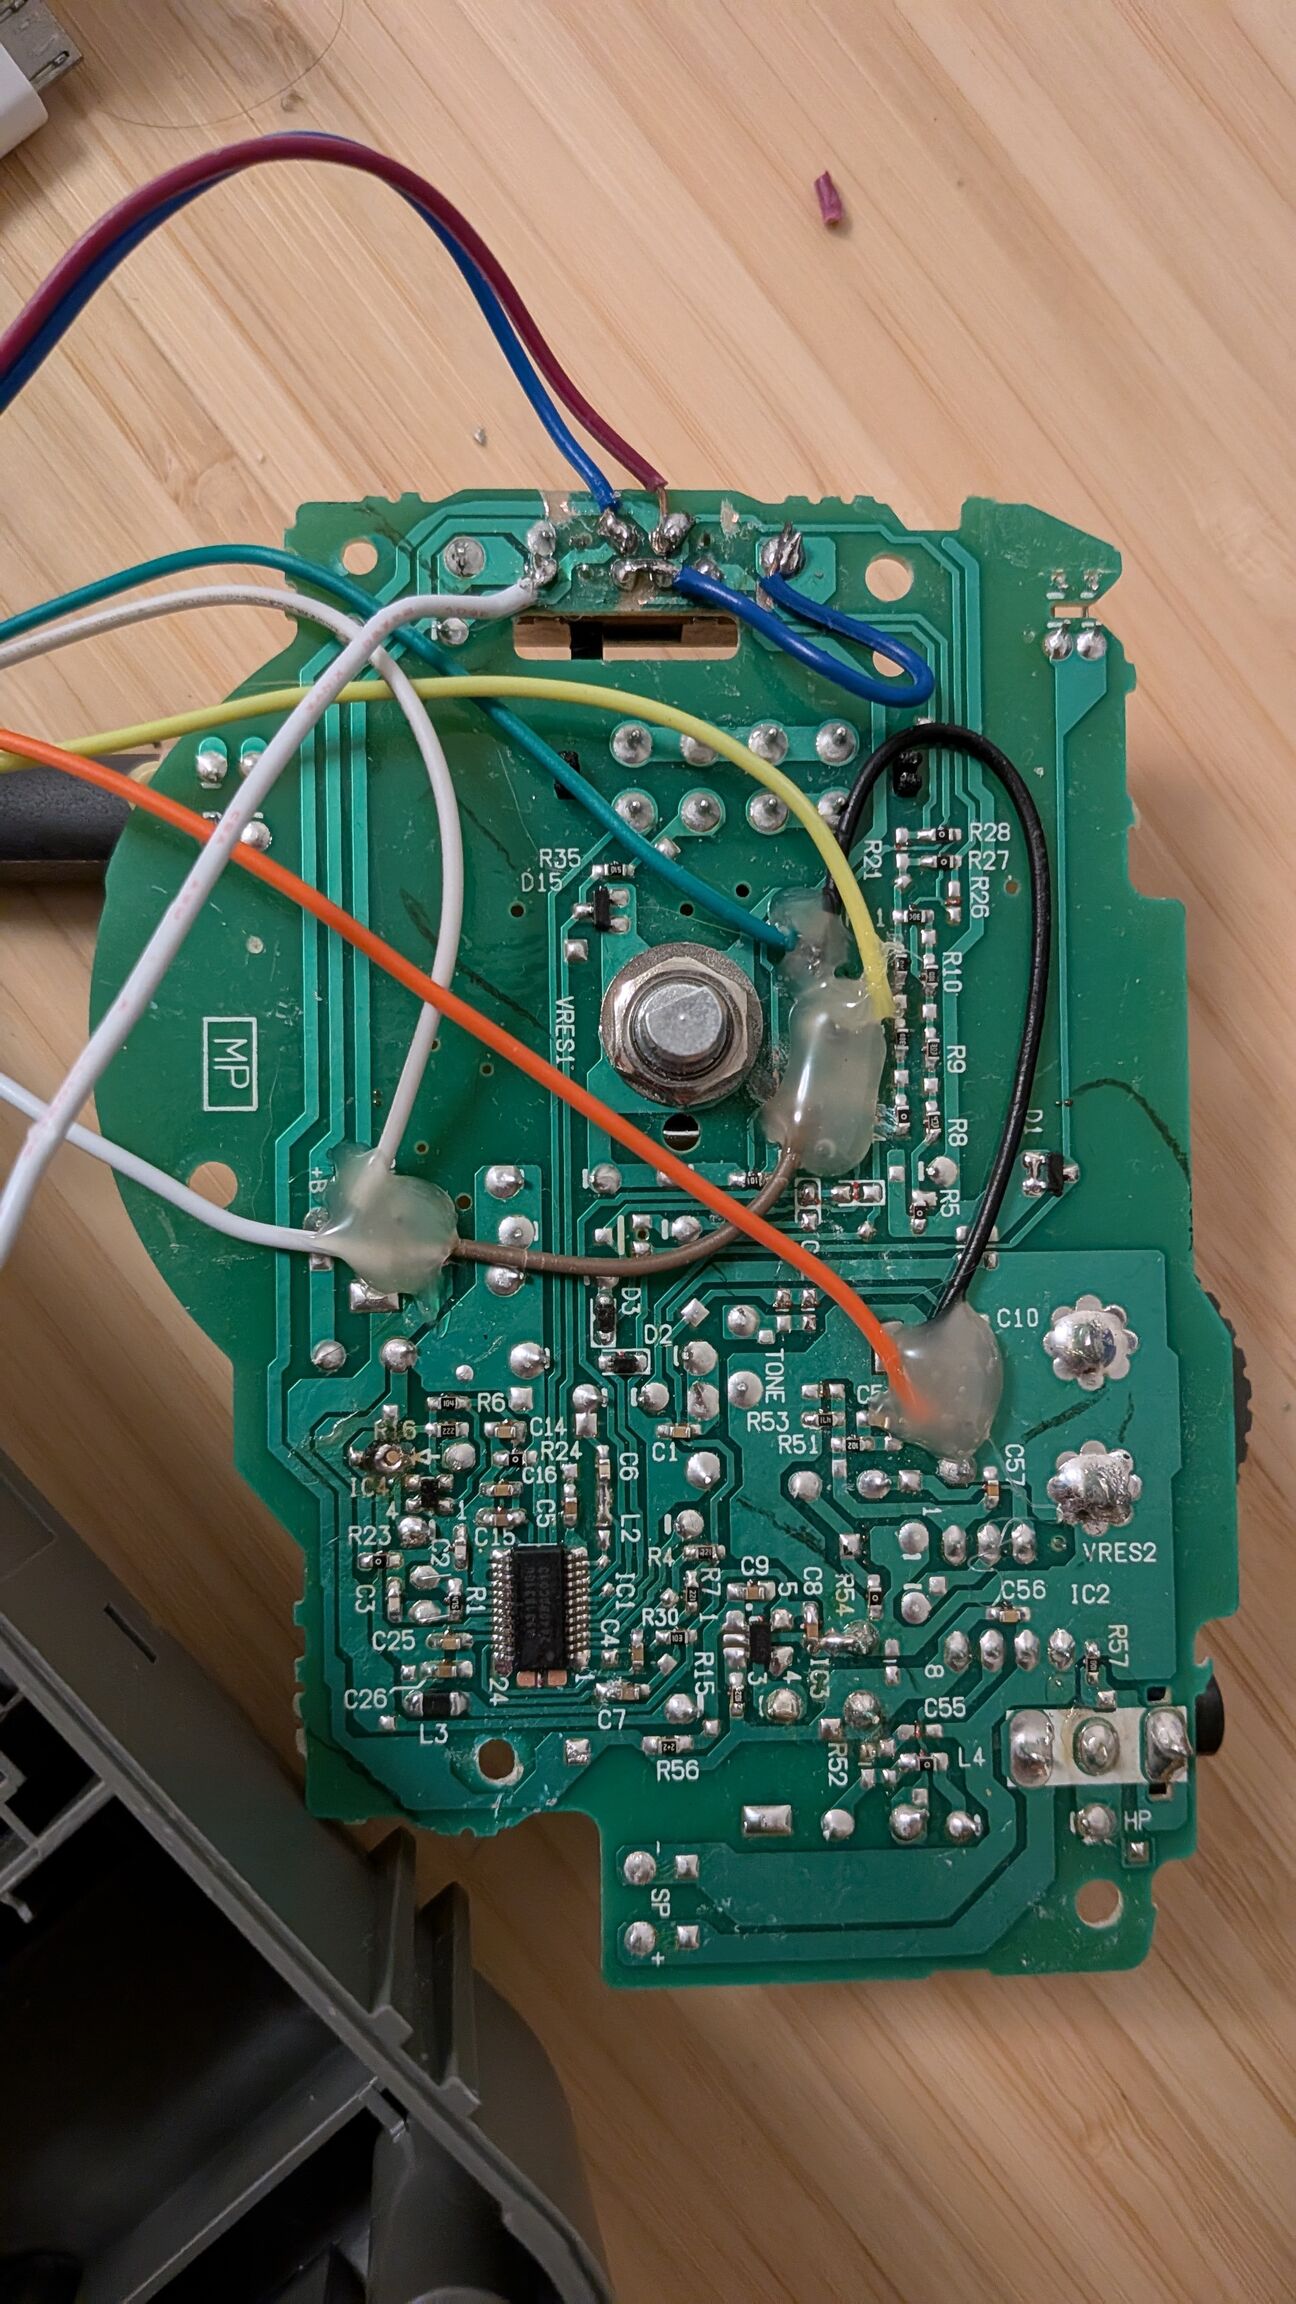
To make them work in our new circuit, we needed to isolate them from the original circuit and its components and wiring. For this I crudely cut out the copper traces using an X-acto knife.
The LED and battery packs had connection wires directly exposed, so I was able to easily desolder the old ones and solder mine instead.
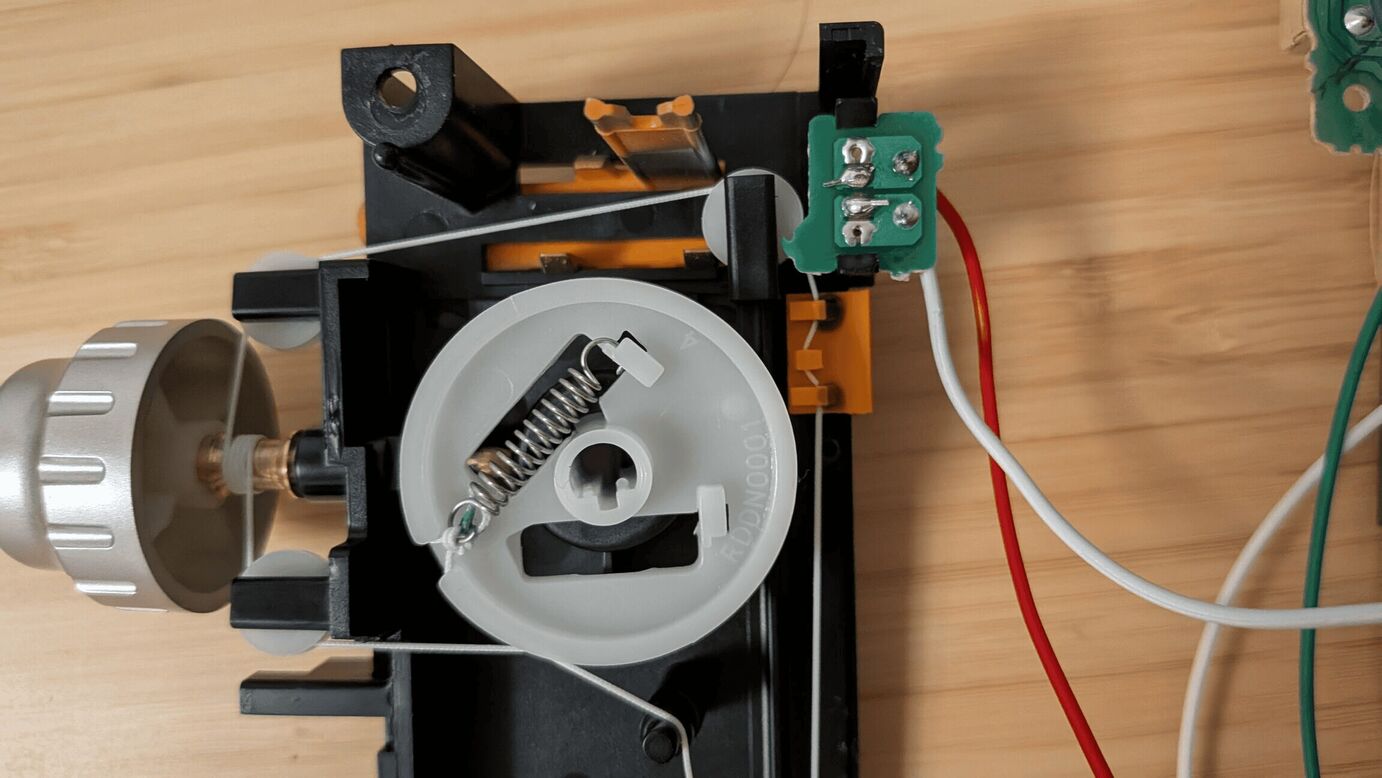
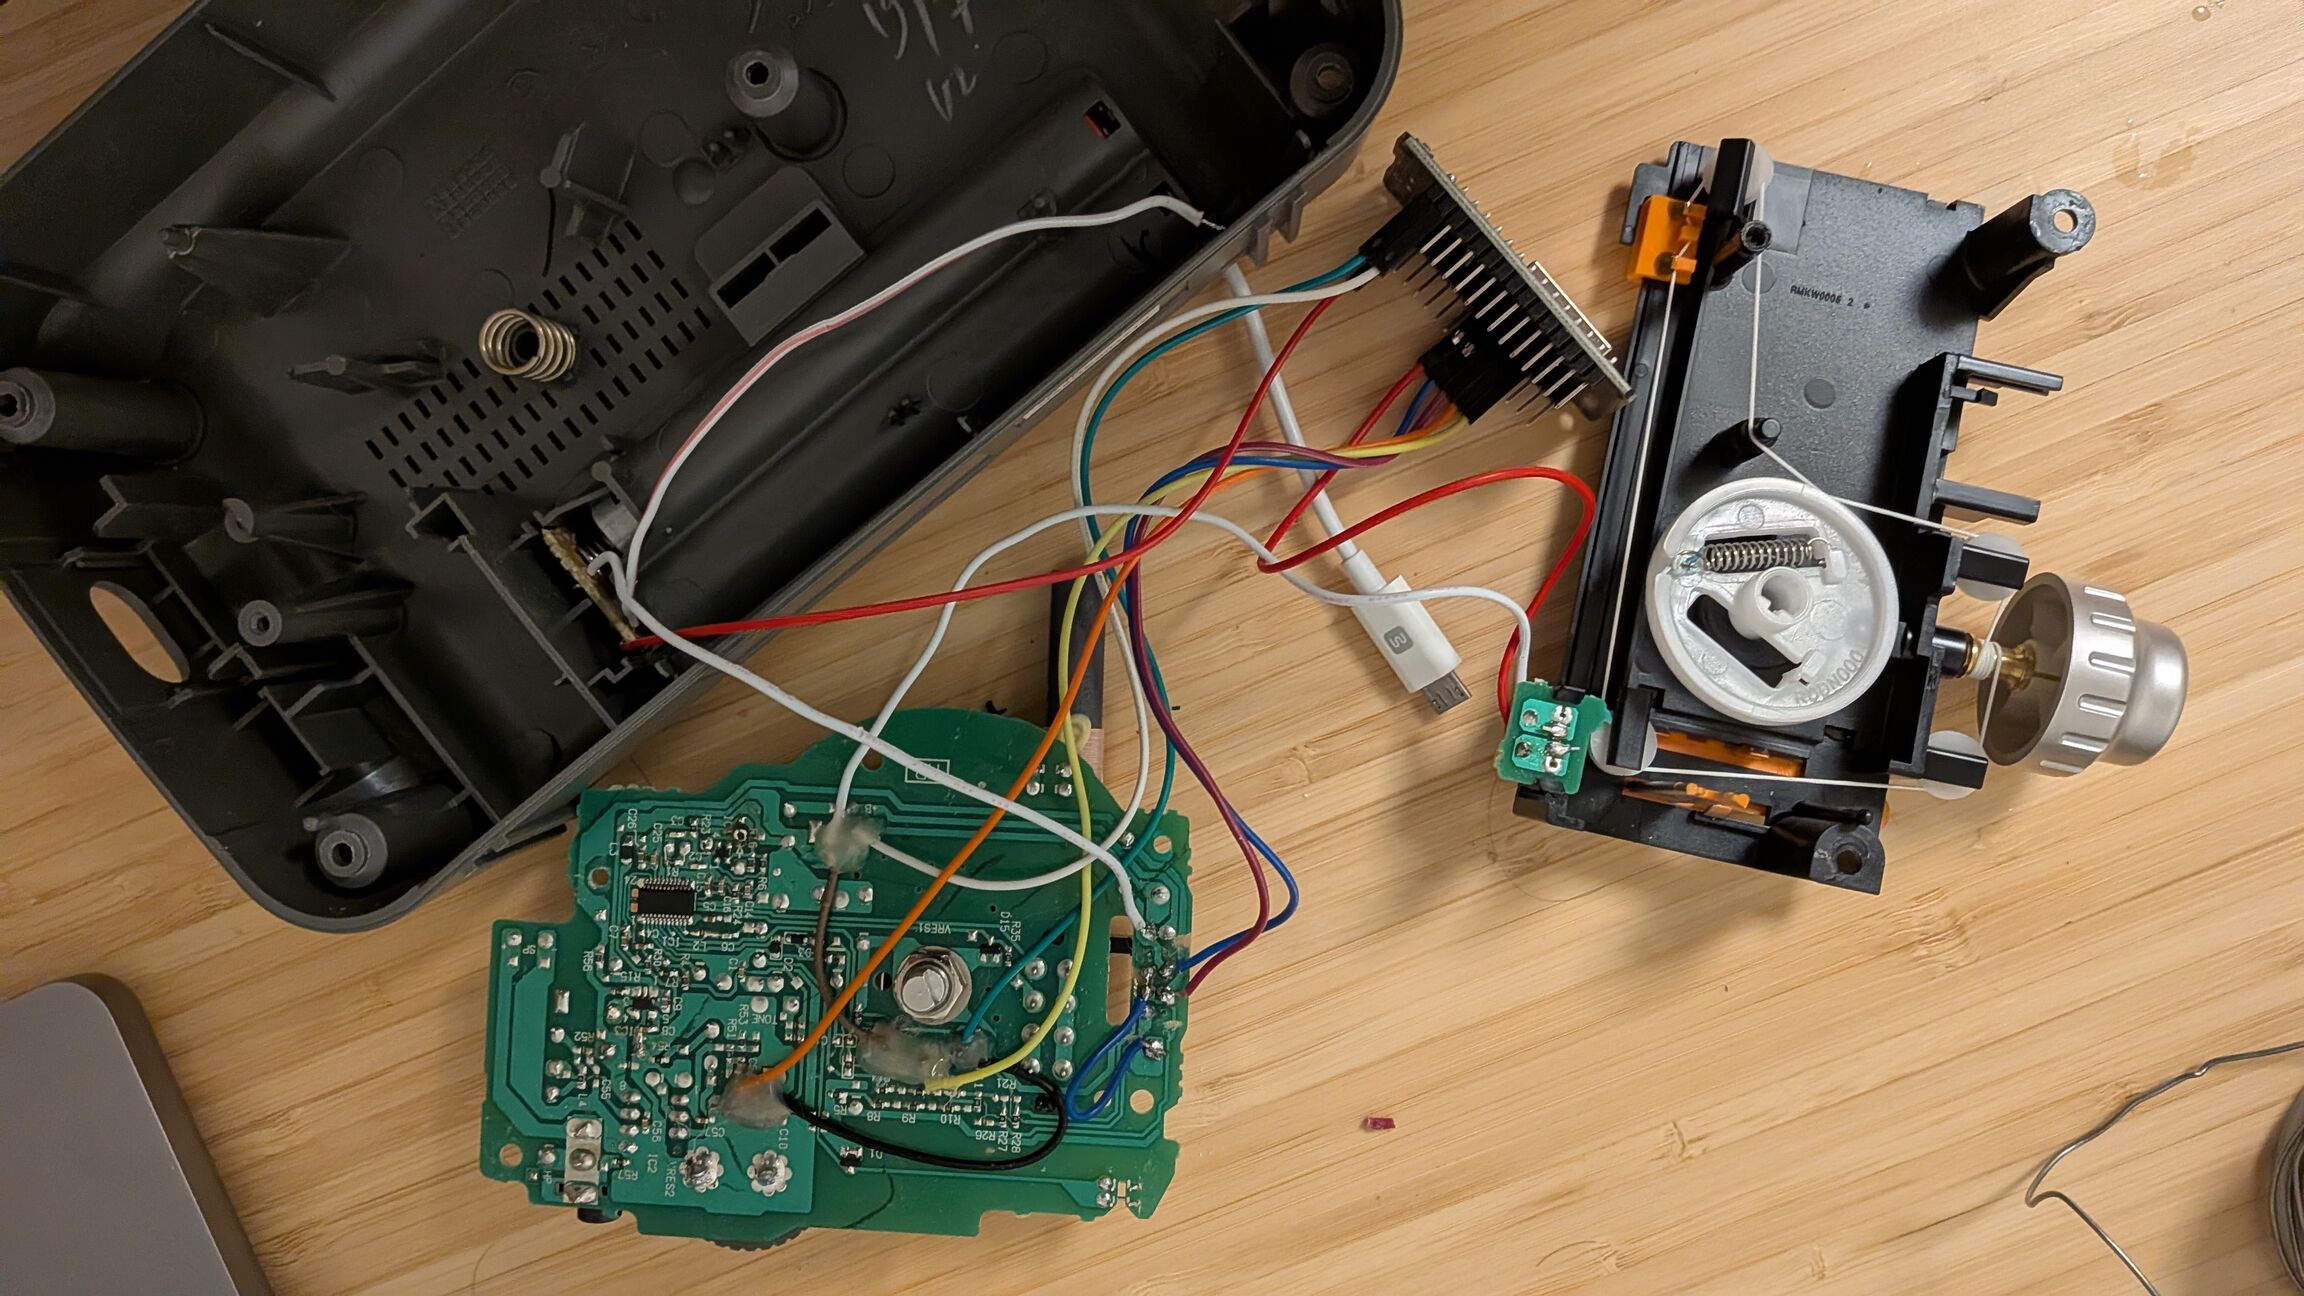
Once the two potentiometers and the 3-position switch were isolated from the rest of the PCB, I soldered new jump wires to a common ground, and to the different GPIO ports on the ESP32, as schematized below:
      ┌─────────────┐
      │    ESP32    │
      │             │           ┌──────────────────┐
      │         VIN ├───────────┤ Battery (+)      │
      │         GND ├───────────┤ Battery (−)      │
      │             │           │ 4x AA NiMH       │
      │             │           └──────────────────┘
      │             │           ┌──────────────────┐
      │             │           │   TUNING POT     │
      │        3.3V ├───────────┤ pin 1            │
      │      GPIO34 ├───────────┤ pin 2 (wiper)    │
      │         GND ├───────────┤ pin 3            │
      │             │           └──────────────────┘
      │             │           ┌──────────────────┐
      │             │           │   VOLUME POT     │
      │        3.3V ├───────────┤ pin 1            │
      │      GPIO35 ├───────────┤ pin 2 (wiper)    │
      │         GND ├───────────┤ pin 3            │
      │             │           └──────────────────┘
      │             │           ┌──────────────────────────────────┐
      │             │           │  SWITCH (SW1, 10-pin DP3T)       │
      │             │           │       ┌───┬───┬───┬───┬───┐      │
      │             │           │   top │ A │ B │ C │ D │ E │      │
      │             │           │       └─┬─┴───┴─┬─┴─┬─┴───┘      │
      │             │           │         │       │   │            │
      │         GND ├───────────┼─────────┘       │   │            │
      │      GPIO33 ├───────────┼─────────────────┘   │            │
      │      GPIO32 ├───────────┼─────────────────────┘            │
      │             │           │ bottom: F  G  H  I  J  (unused)  │
      │             │           └──────────────────────────────────┘
      │             │           ┌──────────┐
      │      GPIO27 ├───────────┤ LED (+)  │
      │         GND ├───────────┤ LED (−)  │
      │             │           └──────────┘
      └─────────────┘

      Shared rails (multiple connections spliced):
        3.3V  → tuning pot pin 1, volume pot pin 1
        GND   → battery (−), switch pin A, tuning pot pin 3,
                volume pot pin 3, LED cathode
Most of the solder joints and connection pads had to be hot glued to be resistant to toddler S.O.P. (shaking, dropping, etc).
Powering
Power source choice
I ruled out plugging it in (except for debugging) to have a wireless user experience. A sensible approach might have been to use LiPo batteries. I am however not familiar with them, and although unlikely, the disclaimers about risks carried by damaged batteries (irrationally?) scared me off.
I opted for a set of 8 eneloops (4 in charging rotation). This simplifies the project a bunch, as I just reuse the 4xAA slot from the original radio, and prevents me from burning through too many regular AA batteries (as explained below, the idle radio still consumes some energy).
Improving battery life
When the switch is in the OFF position, the ESP32 enters deep sleep. While this still uses some energy (~10–50µA according to the datasheet and real-world breakdowns per wake source), a significant “deep sleep” power draw was the DevKit’s red power LED which stays on at all times on my ESP32 board. This LED is hardwired to the 3.3V rail, and draws ~2-3mA, significantly undermining the deep sleep (while being a nuisance… Who needs yet another constantly on red LED in their life?). I chose to physically remove it from the board. I have not at this point addressed the two other power draw sources (the LDO and USB-UART bridge).
When working on boot time improvements (see below), I naively disabled the WiFi powersaving mode (WiFi.setSleep(WIFI_PS_NONE);), expecting it to reduce AP association time and improve overall responsiveness. This did not help boot time, but the setting stayed in for a while, and brought significant battery draw during ON time: WIFI_PS_NONE prevents the modem receiver from going into sleep between beacon intervals. I reverted it to the default WIFI_PS_MIN_MODEM, and this has been a significant improvement.
I now change batteries roughly every 2 to 3 weeks using the 4xAA eneloops.
User interface and visual cues
As previously mentioned, the user interface reuses the dials, switch and LED from the original radio (that is the whole point).
To provide some feedback to the user about station changes, and potential issues, I used the red LED with the following states:
- OFF when the radio is in deep sleep
- BLINKING when booting / connecting to WiFi
- ON when sound is playing
- BLINKING OFF once when switching from one “station” to another
As a useful side effect, when the batteries are low, the LED tends to blink, in a not so regular fashion, informing us of the need to change them.
The frequencies are not annotated, and there is no user-visible map of what station will be played in which zone, but that’s part of the fun of old-school radios: the struggle of finding the tune you want, wondering which station you’re currently on and what it will play next.
Software
Radio-gaga
The ESP32 firmware (radio-gaga) is a fairly simple HTTP REST client. It divides the hertzian frequency dial into 7 (by default) zones. Each is assigned a specific endpoint in the config, which informs the speaker of the selected “station”. The volume potentiometer is averaged and rate-limited, capped to a safe range, and the new value is sent to the speaker API.
The OFF/FM/AM switch wakes the ESP32 from deep sleep when out of the OFF position. Switching back from AM/FM to OFF triggers a POST /stop call, before entering the device into deep sleep.
This switch allows us to select between two sets of hertzian-zone-to-API-endpoint mappings. This gives us 2 x 7 different audio stations, and offers a nice distinction between two modes. I used this to separate a “storytime” mode and a “music” mode.
The values read from the volume and tuning potentiometers through the ESP32’s Analog-to-Digital Converter (ADC) are pretty jittery by nature. Even untouched, their values fluctuate constantly.
This raised two issues to fix:
-
The volume and frequency would get updated constantly. While 1% volume change might go undetected by the users, this hammers the
jacadiAPI with unnecessary requests. To remediate this, we average 8 sample reads from the ADCs, and only send a request when the mapped value actually changes (by more than 1 step on its scale for the volume). -
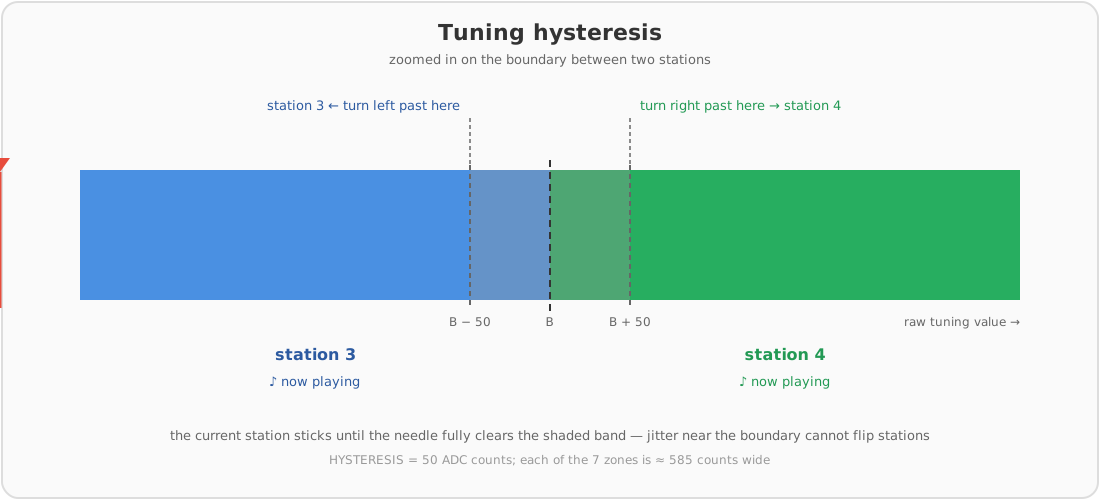
A frequency dial resting close to the boundary between two stations would cause a constant switching between the two audio tracks.
radio-gagahandles this through a simple hysteresis: once a station is selected, we only move to the next (or previous) one once we pass over the boundary + (or -) the hysteresis value. This ensures actual user intent, and prevents constant back and forth on the boundaries.
Debugging
I have a small USB to USB micro cable, plugged into the ESP32’s USB micro port sticking out of the old power input hole, for easy debugging and flashing of updates.
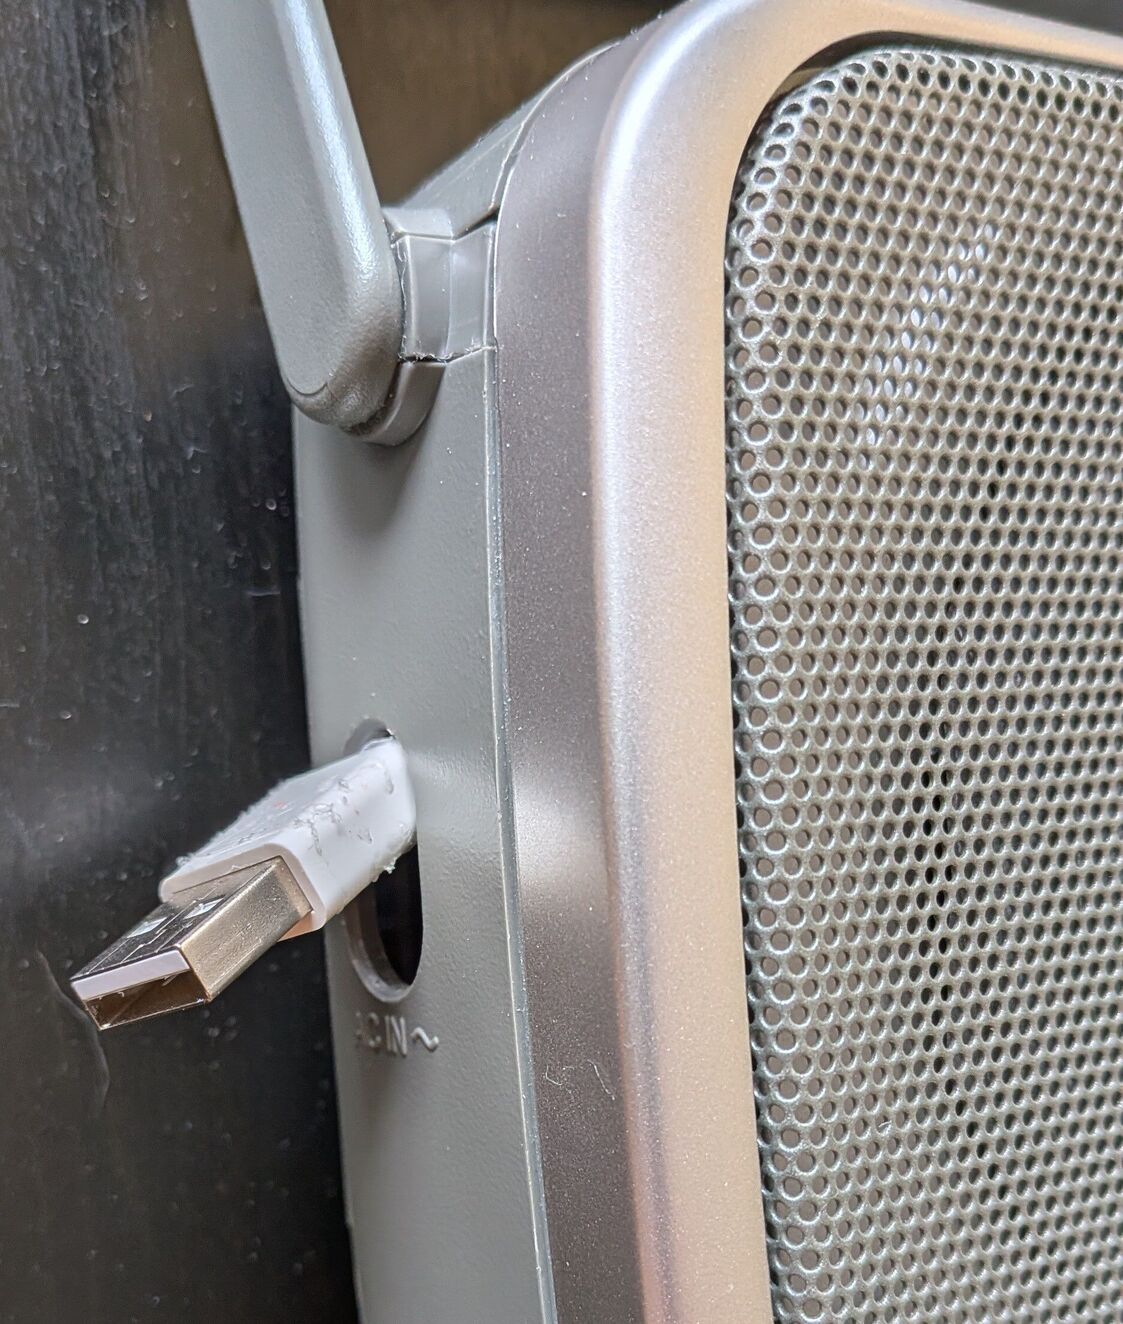
While it is currently loose, I might have to hot glue it in place to reduce toddler temptations to pull on it (or worse, stick it fully inside, forcing me to unscrew the whole thing or wrangle with pliers to make it stick out again).
For flashing and debugging, I use the Arduino IDE.
Improving boot time
In my first implementation, there was a significant delay between flipping the switch on and the music starting to play. This was a bit frustrating, but I initially attributed it to the ESP32’s low computing power, network lag, and the API itself (it runs on a Raspberry Pi, with media on an NFS share).
After a bit of investigation, the pain point turned out to be establishing the wireless connection, and most significantly negotiating a DHCP lease. I assigned a static IP on my router, and along with BSSID/channel caching on the initial connection, dropped the “switched-on-to-music-playing” time to under a second, which feels pretty much instantaneous to the user.
REST API Speaker
I covered in more detail the jacadi REST API in an earlier post, but it essentially exposes a USB Speaker plugged into a Raspberry Pi in my living room, through a REST API.
For this to work, I stored the songs and stories I want to expose on an NFS share mounted on the jacadi container, and added this to my configuration as an EXTRA_ROUTES_JSON:
{
  "radio": {
    "commands": {
      "1": { "text": "1", "type": "folder", "path": "/audio/extra/folders/beatles" },
      "2": { "text": "2", "type": "folder", "path": "/audio/extra/folders/wheels-on-the-bus" },
      "3": { "text": "3", "type": "folder", "path": "/audio/extra/folders/disney" },
      "4": { "text": "4", "type": "folder", "path": "/audio/extra/folders/itsy-bitsy-spider" },
      "5": { "text": "5", "type": "folder", "path": "/audio/extra/folders/abc" },
      "6": { "text": "6", "type": "folder", "path": "/audio/extra/folders/cleanup" },
      "7": { "text": "7", "type": "folder", "path": "/audio/extra/folders/black-sabbath" },

      "11": { "text": "11", "type": "folder", "path": "/audio/extra/folders/cigale-fourmi", "restart": true },
      "12": { "text": "12", "type": "folder", "path": "/audio/extra/folders/corbeau-renard", "restart": true },
      "13": { "text": "13", "type": "folder", "path": "/audio/extra/folders/chien-loup", "restart": true },
      "14": { "text": "14", "type": "folder", "path": "/audio/extra/folders/grenouille-boeuf", "restart": true },
      "15": { "text": "15", "type": "folder", "path": "/audio/extra/folders/lievre-tortue", "restart": true },
      "16": { "text": "16", "type": "folder", "path": "/audio/extra/folders/rat-des-villes-rat-des-champs", "restart": true },
      "17": { "text": "17", "type": "folder", "path": "/audio/extra/folders/war-and-peace", "restart": true }
    }
  }
}
This sets FM band as stories mode, and the AM band as songs.
The REST endpoints created will be /play/radio/1…/play/radio/7 and /play/radio/11…/play/radio/17. Not exposing the media folder names on the endpoint means I don’t need to update the radio config when I change the media. The media wiring happens directly in the jacadi configuration, without a need to connect the radio to a computer and flash the ESP32.
All these route entries have the type folder, which means all the files in the folder will be looped through. The stories endpoints have "restart": true, so that the stories get started from the beginning every time we switch to their station. Song stations will resume from where we left off during the last listening.
Conclusion and future improvements
First, a couple of parental warnings:
- You are building a tool to enable your kid to play “Let it go!” whenever they want (that is to say, all the time). This might impinge on your tranquility.
- When the batteries die during playback, the remote controller stops working, but the USB speaker is very much still on. You should always have hot spares available to make Idina Menzel stop “letting it go” ASAP.
That being said, the radio has been a success amongst kids. It is easy and fun to use, and very easy to update as a DJ: I just need to drop mp3 files in an nfs folder.
The target age range is pretty broad as it can evolve well: 5-7 stations with a couple of songs each for toddlers who have limited motor skills and love repetitions; more stations with more files each for older kids who get bored and want broader content choices.
A couple of improvements I am considering:
- to solve problem #2 mentioned above, I am considering implementing a simple keepalive: the radio sends a ping every 30s. When
jacadistops getting pings from the client, it stops the ongoing playback. - a portable version? I didn’t want to bother with audio playing on the ESP32, and still want to keep
radio-gagaa dumb client, but perhaps hooking it up to a nearby smartphone for on-the-road listening? - address the LDO and USB-UART bridge power draw we discussed in the battery life section. They have well-documented solutions.
- as I am writing this, nemunaire sent me his recent project radieo, which lets you create your own music radio station! Hooking up a couple of
radieo-based Kids FM / Père Castor FM stations tojacadiand having them play fromradio-gagawould be a terrific way for older kids to get more tunes/stories diversity! And you can intersperse your own homemade jingles between songs too!!